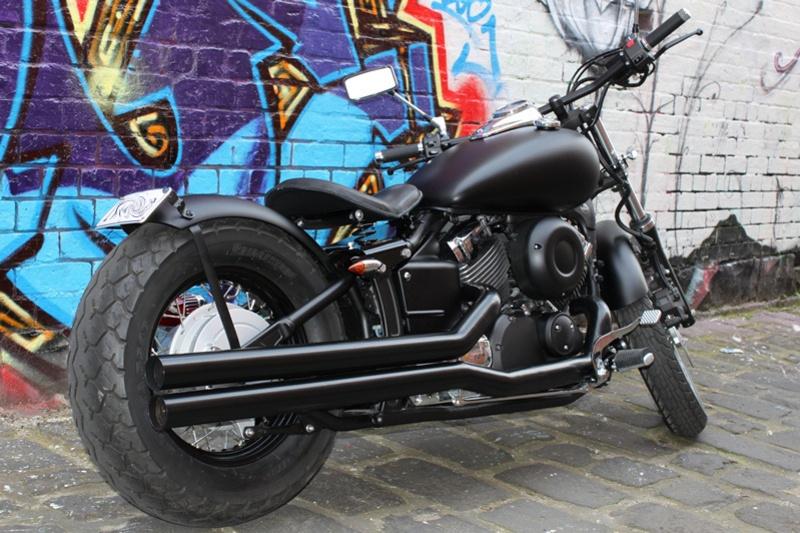
Jimmy G's Custom Bobber
A lot of research and a fair bit of time on the spanners later, Jimmy not only created the bobber of his dreams, but also made some valuable contacts in the motorcycle industry and even kick-started a Melbourne-based club devoted to custom bikes. The conversion from factory spec to the custom you see here was easier than you'd think, too, as Jimmy explained.
I had been looking for a motorcycle (ie. talking about it, but never actually doing much!), for some time, until May of 2010, when on a whim, I decided to swing past a few bike retailers along Melbourne's famous Elizabeth Street motorcycling precinct to see what was on offer. My first stop turned out be my only stop! I walked out with a brand new, 2010-plated Yamaha XVS 650 (V-Star) Midnight Edition Custom with a grand total of 0.7kms on the clock. Some might say I should have shopped around more, but the V-Star was exactly what I was looking for. I had purchased my first new bike and, needless to say, I was very excited!
From the day I purchased the V-Star, I was in love with its ride comfort, great balance and the super smooth feel of the shaft drive, as well as the deep rumble of the Roadhouse exhaust the dealer had fitted. Out the box, the XVS 650 is a great looking bike, too, but I felt it wasn't quite "me". I've always been a big fan of old school bobbers and wanted something with that sort of look, but without the reliability issues and discomfort that comes with owning a genuine rigid frame bobber. If I could get the bobber look without compromising my V-Star's ride and reliability, I'd have the perfect balance - the exact bike I wanted.
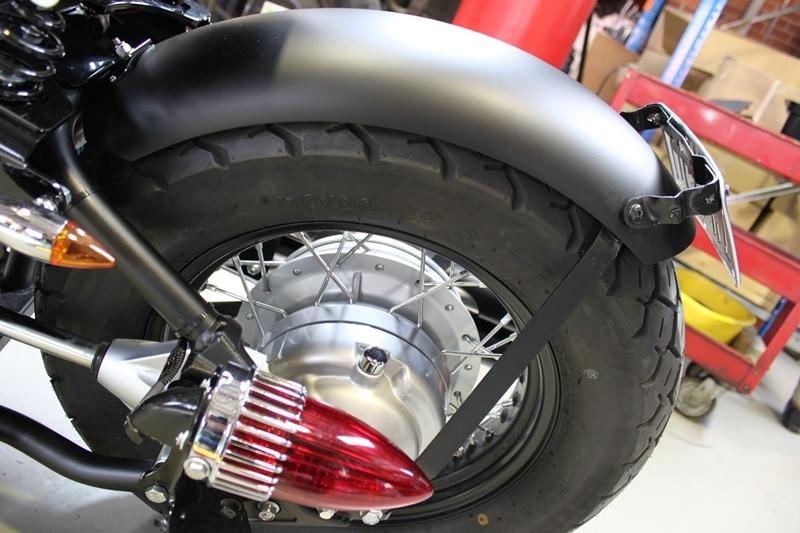
With this vision in mind, I started trawling through websites late in 2010, looking for examples of custom V-Stars and ideas for bobber conversions. I wasn't expecting much when I started, but I found a whole new world! I was really surprised at the amount of companies out there offering some very cool bolt-on parts that could completely transform the look of the bike. Using a few photos for inspiration, I tailored a package to suit my personal taste. There was one aspect of the project that was set in stone before I even started - the finished article had to be BLACK! Black wheels, black exhaust, black engine accents, black tank, black bars. You name it, if I could paint or powdercoat it black, it was going to be black! The 'solo' look of bobbers meant the V-Star's factory cruiser seat and deeply valanced rear fender had to go, replaced by a solo 'springer' seat and bobbed rear fender.
With a list of parts ordered and on the way, I started stripping the V-Star of all the bits that would be replaced.
Thanks to the easy accessability of everything on the Yamaha, the initial tear down was a lot simpler than I had thought. It was all done with basic tools, with no major alterations to the frame, and no need to break out the oxy torch or any other complex tools. By undoing a bolt here and a screw or clamp there, each piece came off easily. In a few hours I was done and the tank, front & rear fenders, side covers, headlight, air filter cover, handlebars, indicators and brake light were all in a pile. Before fitting all the replacement tin, I sent them, along with a set of drag 'bars I had purchased, off to get a coat of matte black paint.
As the bike was so new, I didn't need to worry about any rebuilds of the running gear, but seeing as the engine was easy to get to while everything was off, I decided to re-jet the carby to go with the more free flowing exhaust. Again, thanks to Yamaha, taking out the old jets and putting the new ones in was pretty easy. After that, I took on the task of rewiring the electrics to accommodate the aftermarket head and tail lights. I could have got away with splicing in a few new connections, but I decided to do it properly by running all new wiring from the each light back into the fuse box, then shrink wrapped and put mesh sleeves over any exposed wires to keep everything looking nice and tidy. The end result looked good, but was probably the fiddliest part of the whole build.
About a week later, I received all the tinware back from the painter. I couldn't have been happier with the finish. A deep flat black, with just a hint of satin - perfect! The following weekend I got stuck into putting it all back together. Piece by piece, all the parts went on as easy as they came off. The new rear fender bolted right on, with all the pre-made mounts and brackets lining up without any issues. The solo springer seat kit also bolted straight on with minimal fuss. The new drag bars were the last part to go on. Once in place, they made the bike look even lower and meaner. My Yamaha was now starting to look like the 50s-era bobber I'd always wanted! Finally, I decided to add some exhaust wrap, mainly for aesthetic reasons. A length of 2 inch black heat wrap on each pipe suited the look of the bike perfectly. Standing back from the nearly finished product, the result was pretty awesome. It looked smaller, meaner and tougher all round! It was good, but I reckoned it still needed that little 'something' to finish it off.
Deciding that some subtle decoration would be a good complement, as well as continuing the 50s-era theme, I stripped a lot of the new parts off - only a week after I'd put them all on! The tank and fenders were sent to Steve May at Lizard Designs for some pinstriping treatment, while the seat was replaced with a similar unit, quilted with contrasting white stitching. I left Steve with instructions to create a "lowbrow" look for the tinware. He used simple red, white and black striping along the top of the tank and fenders and put a winged skull graphic on the side of the tank, all done by hand. Very lowbrow and very me! The pinstriping really worked, complementing both the seat and overall look of the bike.
With the pinstriped tin in place, the finished product was more than I ever expected out of a 2010 Yamaha V-Star. It looks very different from factory, and always attracts attention on the road! It's not all just looks, though. The seat is comfortable, and combined with the wide drag bars, makes for a comfortable riding position and good bike control. All in all, the conversion from factory to custom was achieved relatively easily, too - a lot easier than I thought it would be when I started. My bobber has really got everything I wanted - a super simple look, modern technology & reliability, and that old school flair. I couldn't be happier!
Since completing the project, I've had the bike displayed at events, including last year's Motorcycle Expo in Melbourne, and had a couple of offers from blokes keen to buy it! I've also been on a few runs with the club, Kustom Deluxe, I set up late last year. If you've got a custom bike like mine, and would like to get together with like-minded enthusiasts, check out our website at www.kustomdeluxe.com. It's only a new club, but it's laid back, good fun and we're always looking for new members.